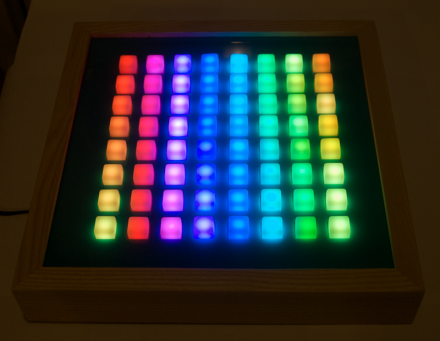
This project has, for a number of reasons, languished unfinished in a box for two years. Now, with encouragement and help from my friends at Hacklab.to and Site3.ca, I’ve finally completed it! In its current incarnation, it is a standalone, full-colour, interactive version of Conway’s Game of Life; with a firmware flash, it can become a monome-compatible USB interface.
Update: I’ve created a project page for a deeper explanation of how the Tinct works.
Features:
- 8×8 grid of cells with wrapped edges (the bottom “wraps” to the top, and the left to the right, like a game of Asteroids).
- Each cell is a button, which toggles the current state of that cell.
- Full-colour – when a cell is born its hue is a mixture of its “parent” cells. As a cell “ages,” its colour evolves over time.
- Boringness detection – if all cells are dead or if the board position is static, the board will reset to a random starting point. The interval for each condition is independently set.
- Two analogue inputs (currently not connected).
- USB port for easy firmware updates.
The colours and the blending look great: the pictures and video don’t do it justice. I still need to route holes in the case for the power and USB cables, and for the analogue inputs, which I do plan on adding eventually. One will control the speed at which the game runs, and I haven’t decided what the other one will do yet (post suggestions in the comments!).

Demoing the colour range
The story
When I started playing with electronics a couple of years ago, I needed a first project. I decided to build an Arduino-based monome compatible controller, and, just for fun, I decided to make it full-colour, to boot. To make a long-story short, it worked; as far as I know, it was the very first “Arduinome.” I called it the Tinct. However, real life conspired to keep me from finishing it, and it sat in a cardboard box, half on PCBs and half on breadboards, for years. The LEDs weren’t even soldered, just held in by friction!
After joining Hacklab, I was inspired to unpack it and get it finished. I realized that one of the reasons I had never completed it is that I don’t really have any use for a monome: all I ever really did to test it was run a version of Conway’s Life, because it makes good use of the full-colour capabilities. Not wanting to finish it only to have it collect dust again, I decided to write new firmware that runs Life without being connected to a computer, so I could hang it on my wall as an interactive decoration.
It took a bit of time (and many cries from fellow Hacklabbers to “solder the damn LEDs in already!”) to get everything soldered and debugged. Mark was generous enough to design and cut the faceplate and some structural components on the lab’s laser cutter; otherwise I might never have downloaded and learned to use a CAD program to do it myself! We used a scrap piece of turquoise acrylic with the original intention of painting it, but the colour has grown on me and I might keep it.
The future
As I mentioned above there are a few minor things to finish up, and some enhancements like analogue inputs. Many people have asked me if the design could be adapted to a larger grid. The answer is “sort of.” It’s possible, but it would take some serious reengineering, new PCBs, and a lot of money for parts and prototyping. I’d love to do it, but I wouldn’t love to pay for it. So, if you’d like to give me a grant or a commission to make a larger version, feel free to email me! (jonathan@ the domain of this website.)
Kits
A few people have asked me about kit versions, and I’m looking into it. The project is expensive, and it isn’t easy, which both complicate things. The main problem for me is the large initial investment, which I just don’t know if I can afford. The solution seems to be raising money through something like Fundable, where nobody loses anything if the minimum funding amount isn’t met. If this is something you’d be interested in, please get in touch (jonathan@ the domain of this website); if there isn’t enough interest, it won’t happen.


