Up, not North

Drawdio hack: the Syntheslicer!

March 21st, 2010 § 5

As a fundraiser for Site 3 I’m planning on holding some learn-to-solder/kitbuilding workshops, using some of the projects from Adafruit*. (If you’re in Toronto and interested in the workshops, please get in touch!) Today I test built one of the kits, the Drawdio. The Drawdio is a toy that attaches to a pencil and uses the conductive properties of graphite to make noise from what you draw. It’s easy to assemble, fun, and perfect for beginners.

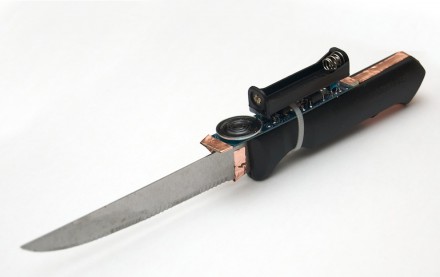
Unfortunately, I was missing a crucial piece: a thumbtack to attach the circuit to the pencil. Of course, the circuit doesn’t have to travel through a pencil, so I attached it to something else instead:

The Syntheslicer

I call it “The Syntheslicer.” Here’s a video of it in action:
» Read the rest of this entry «

Course report: belated wrap-up

March 20th, 2010 § 0

Wow! This post is really, really overdue. Still, better late than never!

I’m very happy with how the course ended up. At the suggestion of the students we did something different for the last class, and attempted to put together what we’d learned to make a simple project: a Gmail notification light. The whole session was much looser than what we’d done in the past (and also much smaller, owing to a conflict with an Olympic hockey game — a deal-breaker here in Canada). We got at least one up and running and, more importantly, I think we all had a good time doing it.

I still intend to produce and post course materials at some point, but it probably won’t be until I’ve had a bit more experience and can make the materials a little more useful. I have many projects in the works right now, including helping to start Site 3, a new collaborative arts and technology space here in Toronto, where I hope to do a lot of teaching in the future. The next one up will almost certainly be an all-ages learn-to-solder/kit-building workshop, and I’ll post all about it here and on the Site 3 site when it happens.

I want to give my sincerest thanks to all of my students, who bravely joined me in trying out this experiment, and to all of my Hacklab colleagues who so graciously let me use the space and in many cases helped out with the course. I can’t wait to do this again!

Course report: weeks four and five

February 18th, 2010 § 0

As I mentioned in the week three report, I was away for week four. A big thanks to my friend (and fellow Hacklabber) Chad for substitute teaching for me! Chad covered buttons and digitalInput, along with how to use serial output to have to Arduino talk to a computer.

The week we worked on how to do analog input with the Arduino; that is to say, how to have the Arduino read a value off a dial, rather than read whether a button is pressed or not. The electronics behind this is a little trickier than anything we’ve done before, which gave me the opportunity to try out some of the things I’ve learned about teaching. Obviously I can’t say for sure, but I think the theory part went pretty well — definitely better than when I tried teaching similar concepts in the first class!

Once we had the theory out of the way, we went to work adding some analog input to our old programs. In particular, we modified our “blinking” LED program so that you could control the blink speed with a knob, and we also made it so we could dim an LED using a knob; then we worked on doing both at the same time: one knob, two LEDs.

Since next week is the final week of the course, we decided that it might be fun to do something a little different: rather than try to teach concepts, we’re going to work on assembling a project that actually does something. Everyone seemed very excited about the idea of a physical Gmail “new mail” notifier, so I think we’re going to try our hand at building one based off of some of the publicly-available plans.

Course report: week three

February 4th, 2010 § 0

I’m totally amazed by how much material we covered in this week’s class! We kicked off with a pretty detailed review of what we did last week, particularly how to hook up the LEDs to make them light up, and how to get our blinking LED programs connected again. We had a few burnt-out LEDs, but that’s an important part of the learning process. Once we had the LEDs connected again we learned about how to make our program behave differently depending on whether or not certain conditions are met; i.e., we learned conditional statements. In particular, we learned the if statement, which only executes a set of instructions if a given condition is true, and the while statement, which continues executing a set of instructions over and over again while a given condition is true.

We used these new conditions to modify our blinking LED a little bit, and then we took a vote and decided to move on to analogue output — making our LEDs dimmer, rather than just “on” or “off. First we learned a little bit about what the difference is between “analogue” and “digital,” and then we saw that we could make our LED look dimmer by turning it off and on really quickly. We then learned that the Arduino could do this for us using the analogWrite command (which unfortunately uses the U.S. spelling of analogue). Finally, we learned about another type of loop — the for loop. This is a little more complicated than the while or the if, but it’s also a little clearer in certain circumstances. We used the for loop to make our LEDs fade in and out smoothly. » Read the rest of this entry «

Arduino code highlighting for the web

February 4th, 2010 § 2

I noticed that there didn’t seem to be any Arduino-specific syntax highlighting available for the web, so I took it upon myself to make an Arduino “brush” for the popular SyntaxHighlighter by Alex Gorbatchev. Since the size of the file supposedly affects performance, I made two versions: a “lite” version that includes all the core Arduino functions and constants, plus the Serial library; and a “full” version that also includes the EEPROM, Ethernet, Firmata, and Wire libraries, as well as (and this is where it gets big) the full set of ATMega168 keywords and macros. Here they are in action on some dummy code. » Read the rest of this entry «

Course report: weeks one and two

January 29th, 2010 § 0

After weeks of planning and giddy anticipation, my course is underway! Here’s my recap of the first two weeks of the course. I plan on making the course materials available eventually, but I want to tidy them up and clarify them before I do. If you’re interested, please check back or subscribe to the site feed.

Week 1

The plan for the first week was to cover the fundamentals of electric circuits that we’ll need for the course: a definition of electricity, how to use a breadboard to test circuits, how to use a multimeter, and some basic electrical theory (for those of you more technically inclined, Ohm’s Law and Kirchoff’s Laws, but the latter just descriptively and not mathematically).

The plan was a little ambitious, and I was not nearly as eloquent a teacher as I had imagined myself being; there were some pretty fundamental ideas that I just didn’t explain well enough, and as a result there was much more confusion than I would have liked.

That said, there was more than a little silver lining: first of all, my students are bright and enthusiastic enough that they pulled through, undeterred, in spite of any pedagogical missteps on my part. Furthermore, I learned some very important lessons about how to teach this material, and I’ve already adjusted my course plans and notes to reflect that. I’m also reconsidering the place of this material within the course. Even more good news is, this was, in my opinion, the most difficult part of the course, so everything should be better from here!

Week 2

Yesterday night’s class went much better. I’d like to think that part of this was because I learned some lessons, but in all likelihood it’s because this material is easier. Regardless, it was a great class for me, and I think everyone else enjoyed it, too.

In this session we moved away from the nitty gritty of how electricity works, and actually started making things! We started by extending last week’s lesson to make some LEDs light up. That out of the way, we moved on to some actual programming!

After talking about what makes a “computer” in general, we discussed how microprocessors are computers that can interact with electric circuits. We learned about functions, and used them to write our first program: a blinking LED! We then added variables to the mix, and used them to make our blinking a little more complicated. Finally, we learned about digital input, saw what happens if you leave an input floating, and how to avoid that problem. Using digital input we had our microprocessor respond to a button being pressed, and we set the stage for exciting developments next week!

I can’t express how proud I am of my class, and how thrilled I am with the enthusiasm and energy the group has together — and I’m not just saying that because they are probably a large fraction of my readership! I can’t wait until next week, when we’ll start making some really interesting things happen!

New course: programming and electronics for everyone!

January 18th, 2010 § 0

I’m very interested in teaching math, science, and engineering, especially to people who consider themselves “non-technical.” I think people with different mindsets bring different perspectives, and so in teaching, I end up learning a lot from the students. Philosophically, I believe that programming and engineering are like cooking: at the very least, everyone should know their way around the kitchen and a few basic recipes. Finally, stereotypical and cheesy though it may be, I think these topics are fun just plain cool, and I love sharing them with others, particularly those who might not do so otherwise.

I have many ideas about how these topics should be taught, and now, thanks to Hacklab.to in Toronto, I have the opportunity to try them out! Here at the basic ideas:

  • Programming is more fun when you can make something happen in the real world, rather than just on screen. So, the course will be about physical computing, and in particular will be based around the Arduino
  • Since we’re doing physical computing, we’ll cover introductory electronics as well as introductory programming
  • The course will teach the theory behind what we’re doing, without getting too bogged down in details; a key concept is trying to develop intuition
  • Even though there will be theory, the course will be very hands on. The process will be teach a little bit, play with the ideas a little bit, and then learn the significance of what we just played with (and repeat)

I’ve gathered together a great group of enthusiastic people for the test run of the course, with the plan being to figure out what works and what doesn’t and to produce materials and a curriculum for future courses (which will all be made publicly available). Right now we’re planning to meet for two hours once a week, for six weeks, and we’ll see how it goes. I plan on blogging about the course throughout, so check back here for more information as it progresses.

This initial run-through of the course is already full, but if all goes well I hope to offer some version of this class in the future, so if you’re interested, please get in touch! All I need now is a catchy title…