Up, not North

Happy Halloween!

October 31st, 2010 § 0

I suppose that if one has a ghost typewriter, and it happens to be Halloween, there is an obligation to make some pop cultural references that make use of it.

For movie lovers:

And for the Zork fans who felt the previous post was missing something important:

Happy Halloween, everyone!

A new way to interact with fiction

October 29th, 2010 § 25

Introducing the Automatypewriter, a new way to experience interactive fiction! It’s still a little rough around the edges (in particular, you can see that the spacebar sticks a little, and the whole thing needs to be tidied up), but you get the idea: the Automatypewriter is a typewriter that can type on its own, as well as detect what you type on it. By reading what it types to you and responding, it can be used interactively to play a game or participate in a story (in this case, Zork).

Though the medium may be the message, a games platform is only as good as its content. To that end I’m collaborating with novelist, graphic novelist, filmmaker, community organizer, and award-winning interactive fiction developer Jim Munroe, who is creating custom software specifically tailored to the Automatypewriter. » Read the rest of this entry «

¿Cómo usted dice “Tinct” en español?*

October 17th, 2010 § 5

Wow! I was recently contacted by the folks at Hangar, a “visual arts production centre” in Barcelona, Spain. It turns out they’ve built their own Tincts from my original design, and have a whole wiki page filled with PCB designs, firmware, software, and ideas. (They call it an OcTinct: that’s a throwback to the original design, when I called the 4×4 version the “TiniTinct” and the 8×8 the “OcTinct.”) What’s more, they’re actively developing and maintaining the project, and they’ve even been holding workshops on it! (I wonder if I could get them to fly me over for one of them…)

¡Gran trabajo!*

* I don’t speak any Spanish, so this is all machine-translated.

Automatypewriter

September 20th, 2010 § 0

I’ve alluded before to some of the new projects I’m working on, and one if them is finally ready to start showing off, at least a little bit. I only wish I was allowed to tell more details, because the best part is still under wraps!

The electronics are pretty simple: each key mechanism is connected by fishing line to a solenoid; the multi-story solenoid bank is visible in the background. Each solenoid is connected to a MOSFET, which is in turn connected to the output of a 74HC595 shift register (with the exception of the shift key, which is controlled directly by the Arduino for timing reasons). The 595 is controlled by an Arduino that translates the serial data from USB to trigger the proper key.

It still needs some work: as you can see in that video, the return key doesn’t always activate when “pressed,” because it has a different mechanism than the other keys. In the bigger picture, right now it is output only, but eventually, it will also send input to the computer using a scheme very similar to that described in this Instructable. On the aesthetic side, the solenoid bank will be hidden in the final project.

Others have done some pretty cool hacks with typewriters: the Instructable is one, and the same creator has done something similar for iPads, all available at www.usbtypewriter.com. There’s also this typewriter-to-teletype hack, which uses an electronic typewriter and has both input and output. As far as I know, though, this is the first project where the typewriter keys move “by themselves” while typing.

That’s the what; of course, the remaining question is why. Unfortunately, my collaborator has sworn me to semi-secrecy. So, if you want to find out where this is all going, you’ll either have to come back for a later post, or, if you’re in Toronto, come visit me at one of the Site 3 open house nights (Thursdays from 6-10). You can see it in action, and maybe even try it yourself!

Site 3 is up and running!

August 18th, 2010 § 0

Wow, has it really been three months since I last posted? Well, I have a good excuse: I’ve been busy helping get Site 3, Toronto’s newest makerspace, up and running. Now it is! We’ve had a lovely writeup on BlogTO (which exaggerates somewhat by calling me the “main man,” whereas Site 3 is very much a collaboration); we’ve had very good attendance at our workshops; my chiptunes workshop was featured on Torontoist and will be on an upcoming episode of Electric Playground; Seth’s pyrokinesis won an editor’s choice ribbon at Maker Faire Detroit; and, in general, it’s been a very busy time. So what are you waiting for? You should come visit us — perhaps on one of our weekly open house nights.

Of course, Site 3 is the only thing I’ve been working on. Keep watching this space in the next few weeks (or perhaps subscribe to the RSS feed) for two new projects I’m working on, and, once those are done, my very first electronics kit!

Life, in colour: The Tinct Lives!

May 13th, 2010 § 1

This project has, for a number of reasons, languished unfinished in a box for two years. Now, with encouragement and help from my friends at Hacklab.to and Site3.ca, I’ve finally completed it! In its current incarnation, it is a standalone, full-colour, interactive version of Conway’s Game of Life; with a firmware flash, it can become a monome-compatible USB interface.

Update: I’ve created a project page for a deeper explanation of how the Tinct works.

Features:

  • 8×8 grid of cells with wrapped edges (the bottom “wraps” to the top, and the left to the right, like a game of Asteroids).
  • Each cell is a button, which toggles the current state of that cell.
  • Full-colour – when a cell is born its hue is a mixture of its “parent” cells. As a cell “ages,” its colour evolves over time.
  • Boringness detection – if all cells are dead or if the board position is static, the board will reset to a random starting point. The interval for each condition is independently set.
  • Two analogue inputs (currently not connected).
  • USB port for easy firmware updates.

The colours and the blending look great: the pictures and video don’t do it justice. I still need to route holes in the case for the power and USB cables, and for the analogue inputs, which I do plan on adding eventually. One will control the speed at which the game runs, and I haven’t decided what the other one will do yet (post suggestions in the comments!).
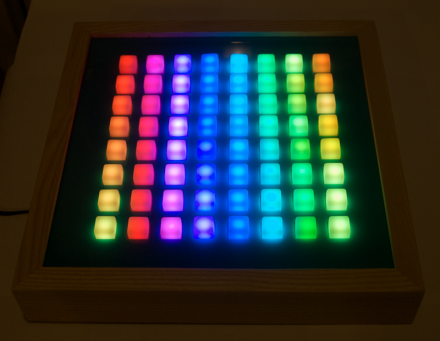
Demoing the colour range

The story

When I started playing with electronics a couple of years ago, I needed a first project. I decided to build an Arduino-based monome compatible controller, and, just for fun, I decided to make it full-colour, to boot. To make a long-story short, it worked; as far as I know, it was the very first “Arduinome.” I called it the Tinct. However, real life conspired to keep me from finishing it, and it sat in a cardboard box, half on PCBs and half on breadboards, for years. The LEDs weren’t even soldered, just held in by friction!
After joining Hacklab, I was inspired to unpack it and get it finished. I realized that one of the reasons I had never completed it is that I don’t really have any use for a monome: all I ever really did to test it was run a version of Conway’s Life, because it makes good use of the full-colour capabilities. Not wanting to finish it only to have it collect dust again, I decided to write new firmware that runs Life without being connected to a computer, so I could hang it on my wall as an interactive decoration.
It took a bit of time (and many cries from fellow Hacklabbers to “solder the damn LEDs in already!”) to get everything soldered and debugged. Mark was generous enough to design and cut the faceplate and some structural components on the lab’s laser cutter; otherwise I might never have downloaded and learned to use a CAD program to do it myself! We used a scrap piece of turquoise acrylic with the original intention of painting it, but the colour has grown on me and I might keep it.

The future

As I mentioned above there are a few minor things to finish up, and some enhancements like analogue inputs. Many people have asked me if the design could be adapted to a larger grid. The answer is “sort of.” It’s possible, but it would take some serious reengineering, new PCBs, and a lot of money for parts and prototyping. I’d love to do it, but I wouldn’t love to pay for it. So, if you’d like to give me a grant or a commission to make a larger version, feel free to email me! (jonathan@ the domain of this website.)

Kits

A few people have asked me about kit versions, and I’m looking into it. The project is expensive, and it isn’t easy, which both complicate things. The main problem for me is the large initial investment, which I just don’t know if I can afford. The solution seems to be raising money through something like Fundable, where nobody loses anything if the minimum funding amount isn’t met. If this is something you’d be interested in, please get in touch (jonathan@ the domain of this website); if there isn’t enough interest, it won’t happen.

Site 3 T-shirts!

March 30th, 2010 Comments Off on Site 3 T-shirts!

I’ll be honest: one of the things I like best about Site 3 coLaboratory is the stupendously awesome logo, which I’ve unilaterally decided to name “Trixie.” So, it is with no small measure of glee that I link to the pre-order for the first t-shirts featuring the logo, which are being sold as a fundraiser. I mean, just look at that design. While I’m on the subject, and because more than one person has ended up on this blog because they were searching for it, I’d like to say a word or two comparing Site 3 to Hacklab.to. (I’m not really going to say much about InterAccess, because I don’t really have experience there.) » Read the rest of this entry «